Showing posts with label tutorial. Show all posts

Wednesday, August 31, 2011

Mix Your Own Foundation Shade!


If you've ever had a foundation that just didn't match, you need to read this post! For those of you who regularly read my posts, you'll know a while back i bought the new Maybelline Fit Me Foundation in the lightest shade possible for me, and it was still way too pink/warm for my skin tone. I also have a L'Oreal TrueMatch foundation that was way too light and too drying on my skin. I have been thinking a lot about how to fix these two products in order to continue using them and not waste any money - i found it!!
A while back at WalMart i found these two cute little travel bottles hanging from the side of an aisle. It comes with one pump bottle, and one squirt bottle for $1.99. At first i had no use for them i just figured at some point they would come in handy and i was right! lol. *I plan to use the squirt bottle to make a homemade brush cleanser. I will do a full review & pics along w/ a recipe for that soon!*
Mixing Your Own Foundation
  1. Make sure you have an empty pump or pour bottle ready to use. They can be bought in the travel-size section in the beauty aisles at your local drugstore and are usually very cheap.
  2. Take two foundations that don't exactly match you, but you think would work well together. I chose these two shades and mixed a tiny amount together before dumping them in the bottle to make sure they made a nice shade. This may take a few tries.
  3. When you've figured out how much of each shade you need - wether it's ½ and ½ or ¾ to ¼ of each foundation - begin slowly pouring them into the empty bottle. Do not pour them in all at once.
  4. When the bottle is about ¼ of the way full begin to shake the bottle to mix to two shades and see if you're happy with the results. If you are - continue pouring the same way. If you aren't - try mixing in different amounts to balance it out until you have it right.
  5. Once you've balanced the two shades and you're happy with the results, fill the bottle up as much as you can. Shake it and mix the two shades together and you're done!!
  6. Shake well before each use.
Luckily i only needed to mix equal parts of my two shades so i basically dumped the entire bottle of Fit Me into the pump bottle and then dumped the entire bottle of TrueMatch ontop of and then shook it to mix them. The shade is still a tad light for me but its MUCH better than the others were by themselves. Because the Fit Me was too pink and a tad too oily and the TruMatch was too dry and too light, they mixed together very well!! Overall im happy with the results and i used the foundation directly after mixing them and it fit me great!
If you try this or have tried this in the past please let me know how it worked out for you, or if you did anything differently! :) Thanks for reading.

Tuesday, August 30, 2011

Make Your Own Brush Cleanser!!


Click to enlarge.

A couple months ago on Luuux I showed you how to mix your own foundation shades as well as foundation tips & tricks for your skin type and i promised i would do another post on how to make your own daily spot cleanser for makeup brushes - so here it is! :) This is not a deep cleanser, it will only remove surface dirt and products from brushes.

You Will Need
1 cup distilled water
¼ cup isopropyl alcohol
1 tablespoon baby shampoo

Mixing Ingredients & Using Cleanser
  1. Mix all ingredients into an air-tight container with a lid.
  2. Pour into any size spray bottle - mine is pretty small but yours can be large.
  3. If any is left over, store in the refrigerator.
  4. Now that you have some in your spray bottle, tilt back and forth to gently mix products.
  5. Spray 2-3 squirts onto a clean folded paper towel.
  6. Rub your makeup brush back and forth onto the wet paper towel to spot cleanse your brush.
  7. When finished, shape brushes immediately then store brushes laying down until completely dry.
Thats it, it's so simple! If you need a deep cleanser for your brushes just mix 1 cup water and a couple tablespoons of baby shampoo in a small bowl and swish brushes around until they're clean. Rinse thoroughly and shape, then store lying down until they're completely dry. Or you could try E.L.F. Brush Shampoo, $3 sold at Target and eyeslipsface.com

Thanks for reading, i hope this helped! Please comment and follow! :)

Monday, July 25, 2011

DIY Light Box for Better Photos!

Click photos to enlarge them


Ever wondered how people get such great photos with perfect lighting and clean white backgrounds? Try this super easy tutorial for making a DIY Light Box in your own home! I did it myself and its so easy!
All photos and written content are mine. This is my written and visual interpretation of an online tutorial i read several weeks ago. I hope this helps!
Cost: Approx. $5 -- Time: 25 minutes
You Will Need:
two pieces of white poster board
4 pieces of plain white paper
scissors
ruler or a straight edge
glue
clear tape
knife or box cutter
    Tutorial: see photos for visual help
  1. Assemble all of your tools and get them ready.
  2. Cut one poster board in half and leave the other whole. You should now have 3 pieces of poster board (2 small,1 large).
  3. On two edges of your small poster boards (the ones you cut) make a 1 inch fold.
  4. Now cut a square in the middle of each small poster board making "windows". using a sharp knife. Leave enough material around the edges to retain some strength.
  5. Take the large poster board and glue it to the two smaller pieces inside of those little 1 inch ledges you folded over.
  6. Loosely tape two pieces of 8.5x11 printer paper onto the window openings of the small poster boards. This will take 4 pieces total (2 per side).
  7. Place your light box near two windows or use two light sources (like lamps, flashlights, etc) on each side of the box (one for the left, one for the right) and you're ready to go! :)
Because this box doesn't have a top it wont be great for super tall objects, but i can assure you its still very large! It can fit a regular sized laptop inside and many many small items. Plus its easy to clean! If you get this dirty just wipe it away. You can also shoot from soooo many different angles because the top AND front are open!
I really should have done this sooner. I have had this tutorial bookmarked in my browser for several weeks, all i needed to do was buy the pasteboard but i always forgot! lol Well, no more! I did not use flashlights as u can see - just my camera flash and an open window. I got a lot of compliments on my photos before but that was thanks to my awesome Nikon Coolpix L110 camera and now they'll be even more amazing! Also - *Price of $5 is under the assumption you only need the poster board and already have the other items at your home. My posterboard was $1.50 each.
Please let me know if this helped you or you have comments, suggestions, questions, etc. I hope my instructions were clear.
If you like this please click "like" and hit the +1 button under the post to spread the word. Thanks for reading! :)
    All photos and written content are mine. Do not use.

Sunday, July 17, 2011

EOTD: Mermaid 2 Ways


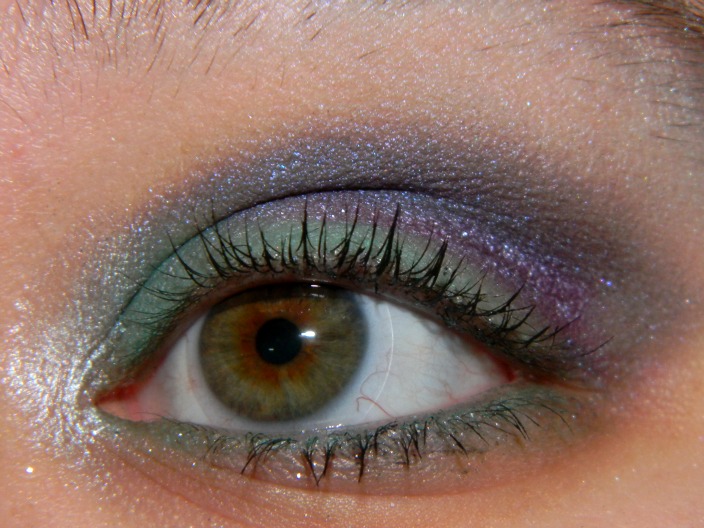
A few weeks ago my online NYX order came and in it was the single eyeshadow in Lagoon (sparkle). It's a beautiful sparkling teal and reminded me of the ocean! So i decided to do some "mermaid" inspired eye looks for you!

Lagoon can be used alot more neutral/safe than these two looks but i was just playing around at the time and wanted to create something interesting. I hope you like them!

Look #1
Urban Decay Suspect on lids
NYX Lagoon in crease, outer corner, and along top lashline
Mark. Eyemarker in Enchanted Forest on waterlines
Rimmel Sexy Curves Mascara on lashes

Look #2
NYX Lagoon (wet) all over lids and along bottom lashline
E.L.F. 32 Pc. Palette (blue/purple) on upper crease
E.L.F. 32 Pc. Palette (amethyst) below upper part of crease
Mark. Eyemarker in Enchanted Forest on waterlines
Rimmel Sexy Curves Mascara on lashes
NYX Jumbo Eye Pencil in Cottage Cheese on inner corners


For those of you who arent used to applying shadows wet, which creates a deeper more pigmented color, try using MAC Fix+ or E.L.F. Makeup Mist & Set spray. Apply it lightly to your finger then rub onto the eyeshadow pan, and finally onto your eyelid. The color will be alot brighter and you will experience less fallout with glitter shadows too. 

Saturday, July 16, 2011

Getting More From Your Eyeshadow Primer Bottles!


Im going to explain to you a simple way of how to get more product from your eyeshadow primer bottles (the ones w/ wands). We all know that at some point you've used up most of the product, but not all of it... yet you cant see the inside so you dont know just how much is left. Well, theres a super easy way to do it, just use tweezers to pull out the stopper!!!
Tools Needed
Tweezers
Primer bottle w/ wand (like UD Primer Potion)
Tutorial
1. Take wand out of primer bottle and set it aside.
2. Using tweezers beging to gently insert sides into primer bottle top around the stopper.
3. WEDGE the tweezers in between the sides of the primer bottle & the stopper.
4. Grab the stopper with your tweezers very firmly and pull out.
It may take a few tries and you might even have to pull super hard but trust me, it comes out eventually! Then you can start using your primer bottle again and get more product out!
So what does this change exactly? All this does is remove the thick plastic stopper that wipes excess product from your wand, it does not compromise your bottle or ruin it.
How does this help me?? Removing the stopper allows you to rotate and swirl your wand around the tube more freely to grab more product from the walls of the bottle and ensure you're not wasting any prior to throwing it away.
I hope this helped! I have used this method many times and it really works. Sometimes i have no idea how much product is left and it ends up getting me an extra several weeks of use from my primer. If you have UDPP or another primer bottle w/ a wand you should def. try this! *photo is mine.

Saturday, July 2, 2011

EOTD: Easy Smokey Eye feat. E.L.F.


A while back i did a brown smokey eye so today i thought i would dial it up a bit and do something a little more dramatic. And, also, as I said yesterday I am still refining my skills on creating smokey looks so bare with me, lol. *Photos are mine, click any image to enlarge it.
SWATCHES
1. Medium champagne shade - (dupe for UD Sidecar) from E.L.F. Neutral Eye Book $5
2. Dark muted plum shade - (dupe for UD Hustle) from E.L.F. Neutral Eye Book $5
3. Black shimmer shade - (dupe for UD Creep ) from E.L.F. Neutral Eye Book $5
4. Milani Liquif-Eye eyeliner pencil in Black, $4.99
5. Maybelline The Falsies mascara in Black, $5-$7
TUTORIAL
1. Apply shade #2 (dark plum) all over lids and creases.
2. Blend shade #3 (black shimmer) into creases and outer corners. May take 1-3 layers to build up color.
3. Using a fluff brush, or whatever you prefer, blend hard edges of shadows.
4. Sweep shade #1 into inner corners and on browbone as highlight.
5. Line top lashline with Milani Liquif-Eye in black.
6. Line bottom lashline with shade #3 (black).
7. Using an angled eyeliner brush, layer shade #3 (black) ontop of Milani Liquif-Eye on top lashlines to set liner and enhance color.
7. Line top & bottom waterlines with Milani Liquif-Eye in black.
8. Add 1-3 coats of Maybelline The Falsies mascara in black to top & bottom lashes.
TIPS
- I always do my eye makeup BEFORE my face makeup (like foundation, powder, etc) because it makes cleanup easier when you have a bare face - just incase any fallout or smudges occur.
- If you arent pleased with the outer lines of your EOTD just dip a Q-Tip in liquid makeup remover and swipe along eyes to define/clean up your lines.
Well, thats all there is to it! Its pretty dark, i must admit, but it would be a pretty nice look for those of you who dont want to use just silvers, greys, and black in a Smokey look since this also incorporates champagne and plum shades. I definitely wouldnt wear this during the day but i would wear it on a date night w/ the husband or out with the girls. BTW: This E.L.F. Beauty Book, Neutral Eye Edition $5, is a spot-on dupe for Urban Decay Naked Palette!!
Please read, like, comment, and follow!! :)

Monday, June 20, 2011

The Power of Makeup


I recently did an FOTD using the new Wet N Wild summer products, and at the time i had taken photos of my full face routine. I did post them on Luuux but i was a little self conscious of posting them anywhere else... just to be honest. However, Huda inspired me to go ahead and post them thanks to the one she recent did. Everyone please check out her blog!! :)

Thanks to the a new foundation I tried, i have had a recent breakout (ugh!!) so i am currently trying to cover that up which means i need alot of concealer. You can read the steps below, or view them above.

My Routine

  1. I begin with a bare face and apply a primer like L'Oreal Studio Secrets Magic Perfecting Base.
  2. I then use a small concealer brush to apply a green concealer like Physicians Formula Conceal Rx in Soft Green to any red spots or blemishes.
  3. After that has dried (its quick) i use Physicians Formula Conceal Rx in Light which is skin tones to cover the green concealer.
  4. I pat around the edges of the concealer to soften it.
  5. After that i apply my foundation with a stippling duo fibre brush (Sigma F50) which is a mix of 1/2 Maybelline Fit Me in 115, and L'Oreal TrueBlend in Porcelaine.
  6. I allow my foundation to set for about 5 minutes then i top it with an M.U.F.E HD Powder to nix any oiliness.
  7. After im finished with my face i continue on to my eye makeup, which in this case was Wet N Wild The Gilded Age eyeshadow trio.
  8. I finished with Wet N Wild Everything Under The Sun Bronzer and Wet N Wild lipstick in Bare It All.
Thats it!! I can do this process in 10-15 minutes if rushed but i tend to take my time in order to ensure i get it just right, LOL. I think i look a million times better with makeup and while i dont always wear a full face i sometimes just do eyeliner + mascara and leave it at that.

Once my face clears up, because its summer, i'll be using a tinted moisturizer instead of foundation.

Thursday, June 2, 2011

Aspirin Face Mask Tutorial

Wether you have perfectly acne-free ‘normal’ skin, or you have a little blemishes, or alot you need to try this mask! Its so simple and easy to make its ridiculous. After using this my face was baby soft, all redness and any flakiness was gone!

What You Need:
2-3 non-coated aspirins
2-3 drops of water
2 small drops of honey

Tutorial:
1. In a small dish or plastic cup put 2-3 aspirins in the bottom.
2. Put one drop of water on each aspirin. They will quickly disintegrate.
3. Add one or two small drops of honey on top and mix in with the aspirins using your finger making a paste-like consistency.
4. Apply to entire face rubbing in small circular motions which exfoliates skin. If you dont want this on your whole face use one aspirin, one drop of water, and one tiny drop of honey and use this as a spot treatment instead.
5. Leave on for 10-15 minutes.
6. Get hands wet with warm water and rub mixture thats already on your face to exfoliate a little more.
7. Using a warm wet wash cloth remove the mask by wiping face. Rinse with cool water to close or ‘seal’ pores when finished.

Thats it! Its very simple yet very effective at the same time. I noticed a HUGE difference in my skin just after one use.

Wednesday, April 6, 2011

Tutorial: Wake Up With Beach Waves!!


Today I'm going to show you my tutorial (with pictures) on how to wake up with sexy beach waves!! The steps are very simple and you dont have to use the same hair products as I do, just use whatever you have at your home, or you like alot.

STEPS:
  1. Wash hair with a curl or wave enhancing shampoo. My hair is thick/long so I dont condition afterwards.
  2. After washing, use a wide tooth comb or detangling comb on wet hair.
  3. Apply a leave in conditioner or curl/wave enhancing gel or cream. I used WEN Sweet Almond Mint Cleansing Conditioner. 
  4. Comb through thoroughly.
  5. Allow hair to air dry for 5-10 minutes.
  6. Pull hair into a high pony tail.
  7. Pick up pony tail and twist tightly, then wrap around the base in a circle to make a bun. 
  8. Apply another elastic band on the outside of the bun to secure it. 
  9. Leave in over night for sexy beach waves in the morning!
TIPS & TRICKS:

  • If you wake up throughout the night and your bun has come undone, try to put it back up (if you're not too tired, lol) until morning. When you get up in the morning remove both elastic bands  and tousle hair. I find it best to finger comb instead of using anything else because it has a tendency to mess up the 'beach wave' effect. Feel free to apply a scrunching gel or light-medium hold moveable hair spray.
  • Because I have really thick long hair, when I wake up in the morning my hair is still mostly wet (crazy, i know!). So i usually blow dry hair a little before doing this.
  • Your roots are not going to be very wavy from being pulled tight into the bun alnight, so i like to give myself a 'bump' or a 1/2 pony tail.
  • If your hair isnt quite as wavy as you would have liked when you wake up, simply take a hot curling iron and quickly twist some pieces around it with your fingers to fix any straight pieces and perfect your wave.