Saturday, July 30, 2011

July 2011 Favorites!


Hey everyone! These are my July 2011 monthly favorites! Some are repeats from last month but its only because I love them so much and im still using them on a daily basis. I hope you like everything ive chosen for my favorites and i cant wait to see everyone elses!
Search the my beauty blog or luuux page for individual reviews on each product.
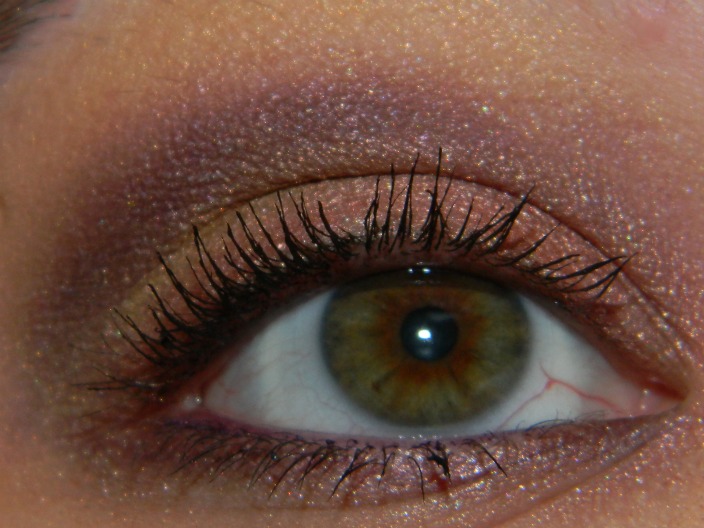
AVON 12-in-1 Eyeshadow Palette
    This palette has 12 beautiful shimmery/metallic shades (but none with full on glitter) and NO matte shades. It has a great shade range and even has 3 dupes for Urban Decay eyeshadows in it! Ive been using it a lot since i purchased it a couple weeks back.
Rimmel Clean Finish Foundation
    I love this foundation! It has a beautifully whipped texture and the cap has a wand attached so you can get the product out easier. Its about $3 per bottle which is super cheap, it has a great finishes, blends perfectly, and is super light weight!
LUSH Honey I Washed The Kids Perfume
    Holy COW this stuff is amazing! I love anything from LUSH that has the Honey I Washed The Kids scent (scoop, massage bars, bath bombs, etc) but this perfume tops them all. Its definitely VERY sweet and seductive but natural at the same time. Its like slathering yourself in honey and chocolate. Mmmm.
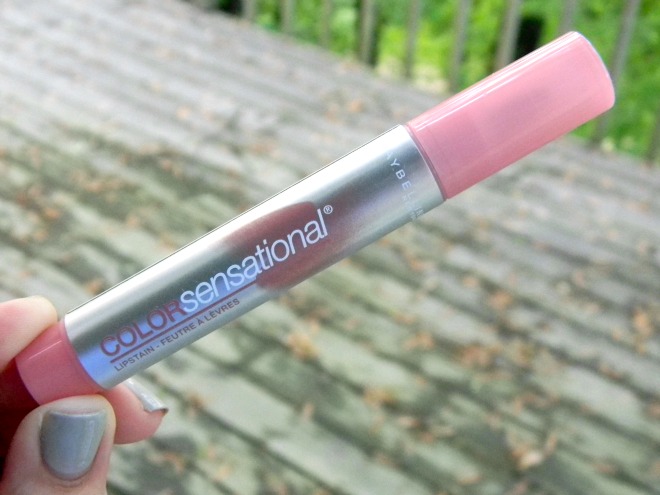
E.L.F. Matte Lip Color in Natural
    Thanks to the lovely Holly Ann i finally got to try this product and it quickly ended up being my all-time favorite lip color! It glides on smooth, doesn't dry out my lips, and looks very, very natural on me. Great product!
Physicians Formula Happy Booster Bronzer
    Another awesome product from Holly Ann! This is a super light bronzer w/ a cute little pink blush heart and it smells awesome! It has a light floral scent that i love and the finish is very silky and pretty.
AVON Nail Experts Cuticle Balm
    I have a few favorite cuticles creams/balms but i have been using this one more than others for some reason lately. It has a light floral/lavendar-ish scent, its incredible creamy but never greasy, and absorbs quickly. My only complaint is that the lid is super hard to get off :(
E.L.F Coral Nail Polish
    Hellooo this is so gorgeous! This was given to me by Crystal Nichols in a giveaway she held recently and i absolutely adore it! Its a peachy-pink polish with golden shimmer and its perfect for Summer. Not to mention its only $1 and is opaque in almost 1 coat.
Essie Marshmallow
    Finding a good white polish is so hard! They're usually very chalky and harsh looking but Marshmallow is not like that at all. It has a soft glow and even thought it takes about 3 coats to be opaque its totally worth it! Such a beautiful white polish :)
Scunci No-Slip Grip Clear Rubber Hairbands
    These are rubber/silicone-like and definitely not your typical hair band. They're super sturdy and stiff but once you get them on they do NOT slip or loosen at all. These will hold a pony tail or bun ALL day long - seriously. They do come in other shades but my only complaint is that removing them hurts :( If you're not careful they can tug on hair.
Organix Moroccan Argan Oil Shampoo, Conditioner, Penetrating OIl
    I am in love with all three of these products. I have thick hair w/ oily roots and dry ends but this line totally controls every aspect of my hair and makes it super smooth, silky, and shiny without being greasy or heavy. Deifnitely the best hair products i have ever used! I would recommend them to anyone! :)
Thanks for reading! I hope you enjoyed my post and my monthly favorites! Please comment, like and follow! Photos are mine, do not use.

Organix Moroccan Argan Oil Products


These are my three new favorite hair products - ever!! I am so amazed at these that i dont even care they're a little pricey, LOL.

I first bought the Organix Moroccan Argan Oil Penetrating Oil at Walmart and after 2 days of used i was sold and knew i had to try the Organix Moroccan Argan Oil Shampoo also, which i bought at the CVS like 3 mins from my house. I dont have a need for the conditioner as my hair is thicky, heavy, and a little oily so it would only make it worse and using these two products only is working wonders by themselves!!

Despite the fact that these are made from a type of oil, which will make some people think they're heavy or greasy, they definitely ARE NOT!

The shampoo is creamy, soft-yellow in color, and smells really nice and fresh. I need about a quarter sized amount for my medium length thick hair. It lathers really well for me and instantly make my hair feel soft and clean. This shampoo does not make my already oily roots any oilier or weigh my hair down AT ALL! Looooove this shampoo!

The conditioner is creamy and rich but never weighs my hair down. You leave it on for 3-5 minutes then rinse thoroughly and it definitely works well! Im not the type that needs a conditioner daily so this is perfect for me to use about every 2-3 days to keep my hair soft and supple.

The pentrating oil is what you would expect - an oil! LOL. However, its very thin and not thick or greasy at all. To Use: I apply a dime sized amount in the palm of my hand and vigorously rub palms together to heat the product and make it even easier to apply to my damp hair. I rub it on - concentrating on my ends - then comb through. This stuff is so amazing. I have never, ever used an oil like this that gave me such awesome results. It never feels heavy, greasy, sticky, or slick on my hair. It makes it soft and supple and so easy to manage.

Prior to using these three products my hair was usually pretty tangly and knotted after getting out of the shower. Now, even just from using the shampoo alone, my hair is never tangled. Then when i apply the oil to my damp hair its EVEN easier to comb through and i have zero tangles! These products have seriously saved my hair. Yes, they're pricey but they are sooo worth it and if you have issues with split ends, frizz, dryness, or tangling PLEASE try these!

Photos are mine. Do not use. Please comment, like, and follow! Thanks for reading :)

Friday, July 29, 2011

EOTD: I'm Getting Sunburned Trio


A few weeks ago i purchased the I'm Getting Sunburned Trio and I reviewed it a couple days ago on my blog. Today i want to show you the EOTD i created using the simple steps included with this trio.

Tutorial

  1. Apply a primer like UDPP to lids.
  2. Sweet gold eyelid shade all over lids and along bottom lashline.
  3. Shade dark brown crease shade into creased and along top lashline as liner.
  4. Apply pink shimmer browbone shade onto browbone as highlight.
  5. I finished with black eyeliner on my waterlines and black mascara.
Thats it! In my opinion this is definitely a 'night' look, its too dark for daytime use. Im sure you could mix it up a little and use the shades differently to create a softer look but theyre all still very shimmery - and they also do have some fallout.

Thursday, July 28, 2011

EOTD using new Sigma brushes and UD Naked palette.


This is the first look i ever created with my Urban Decay Naked palette, and i find myself re-creating it quite often because it's always been my favorite. This time i decided to do it using my new Sigma brushes!
This look is slightly darker IRL, but i think my flash washed it out, sorry. It's a nice feminine mauvey look.
Swatches
1. UD Virgin
2. UD Sin
3. UD Toasted
4. UD Hustle
5. CoverGirl LiquiLine Blast eyeliner in Brown Blaze
Tutorial
1. Using Sigma E55 eye shading brush, apply UD Toasted all over lids. Then use E05 eyeliner brush to also apply Toasted on bottom lashline.
3. With Sigma E30 pencil brush shade UD Hustle into outer corners only.
4. With Sigma E70 medium angled brush sweep UD Sin on browbone as highlight.
5. Using Sigma E40 tapered blending brush, dab into UD Toasted lightly, wipe or tap off excess product and gently use over top of UD Hustle (step #2) to diffuse and soften harsh lines. Use small circular motions.
6. Once again, using Sigma E30 pencil brush apply UD Sin into inner corners to brighten eyes.
7. Swipe CG LiquiLine in Brown Blaze onto top & bottom waterlines.
8. Coat lashes with black mascara.
Thats it! I know the tutorial look tedious but its easy - i was just trying to be specific. Obviously if you dont have Sigma Brushes or UD Naked palette you can substitute them with any other brushes or eye palette/shades and create the same type of look. Thanks for reading!

OPI Shangri-la-la Lilac


This beautiful pastel purple is OPI's Shangri-la-la Lilac. Its an old shade from a few years ago but still a good one. I bought it on transdesign.com for a little over $5 which is pretty cheap for OPI.
Comparing this to Essie's Lilacism - another pretty lilac shade - this is more pink toned, where Lilacism has blue undertones. To be honest, i like Shangri-la-la Lilac alot better!
SWATCHES
1 coat AVON Lemon Fortifier as base
2 coats OPI Shangri-la-la Lilac
1 coat INM Out The Door topcoat
[PROS]
opaque in two coats
applies smooth
cream formula
would suit alot of different skin tones
not streaky or patchy at all
great Spring shade
dries quick
[CONS]
Because this is an older OPI shade it's only sold online, not in stores, which may make it hard to get for some.
This particular bottle has the old OPI brush tyle (not the new pro-wide one) so thats a downside, but still applies great.
Loooove this shade!! For me its like the perfect hybrid of pastel pink and pastel lilac. The formula was great, no disappointments there, and it dried pretty quickly so overall im pleased!

Wednesday, July 27, 2011

WnW I'm Getting Sunburned Trio


This pretty Wet N Wild eyeshadow trio, called I'm Getting Sunburned, is the perfect Summer bronze goddess eye look (just like The Gilded Age trio!!). It comes with beautiful shimmery shades in iridescent pink, dark brown w/ golden shimmer, and bright gold.

I've used this trio several times since Summer started and i really love it! Although i do have to say its very shimmery and light reflective - this is NOT a matte look at all. If you need to tone it down just apply it lightly with a fluff brush or eye shading brush.

As always, Wet N Wild eyeshadow trio's are very pigmented, smooth, and soft! This is the MOST pigmented WnW trio i have ever used!!

$5 DUPE for Urban Decay Naked Palette!

Check out this post on the $5 E.L.F. Beauty Book in Neutral which is a Urban Decan Naked dupe!! Its the most visited page on my entire blog and gets tons of traffic so i figured i'd do a quick link re-post for those of you who havent seen the swatches!

EOTD: AVON 12-in-1 Look #2


Hey everyone! This is my itsjudytime contest entry for luuux.com! I have done variations of this eye look soooo many times but today im going to show it to you using my new AVON 12-in-1 Palette which is very affordable! It comes with 12 beautiful shimmery shades at only $13.99 :)
I have always loved this eye look for summer because its a great alternative to neutrals or even the smokey eye! Plus it goes great with my green eyes. Using mauves and burgundies in place of browns or blacks is a great way to spice things up and keep your look fresh! Summer is the perfect time to add a pop of color into your look wethers its in your clothes, on your nails, or your eyeshadow!
Tutorial
  1. Apply a primer like UDPP to lids.
  2. Using a fluff or shading brush apply a deep burgundy shadow into creases and blend out.
  3. Sweep a light mauve or dark pink shadow all over lids and along bottom lashlines.
  4. Apply a fuchsia shade into creases just below the deep burgundy color.
  5. Highlight browbone and inner corners with a sheer shimmery champagne shade.
  6. Finally, Line waterlines with plum eyeliner and coat lashes with black mascara!
Thats it! Isnt it easy?? Anyone could create this look and you could even substitute shades that suit you (like blues, greens, etc) instead of using variations of pinks like i did. Pair this with a tinted moisturizer with SPF, some bronzer, a nude lip, and you're Summer ready!
I hope you enjoyed this post and my EOTD! If you have any comments or questions feel free to ask. For contest rules and info, click here!


Tuesday, July 26, 2011

Revlon ColorStay SoftFlex Foundation for Oily/Combination Skin


I have heard so many people rave about this foundation, so when i saw it on sale at CVS for 50% off PLUS i had a $4 coupon off any Revlon purchase of $10 or more - i knew i had to try it!! I ended up getting this foundation for less than $3 which is a total steal.
I bought this foundation in 150 Buff.
PROS
not to runny, not too thick
medium-full coverage, usually i dont even need concealer
blends very well into my skin
no scent
nice packaging
long lasting
lightweight, feels like nothing is on my face
controls my oil
doesnt "melt" in heat
has SPF 6
50/50
This is liquidy enough to be in a pump bottle, and would be alot easier and more sanitary to use if it were. However this isnt a huge issue.
CONS
Looks cakey at first no matter now light i apply it, that fades quickly though but i find that if i apply a powder over this it continues to look cakey all day. So its actually just better used alone with no finishing powder on top.
I have tried soo many new foundation lately, mainly because they were uber cheap, but this one (alone with Rimmel Clean Finish) is my favorite! The fact that i dont have to use concealer or a finishing powder takes 2 steps out of my routine and actually makes it quicker.
Its been 90-100 degrees here lately. My favorite thing about this is that i can wear it outside even when its super hot and humid and it never feels gross, melts, or wears off. The shade looks a tad too light/yellow for me but because the foundation blends so seamlessly it actually ends up matching me perfectly. I would highly recommend this! Its also made for normal and dry skin also.

CoverGirl Forever Fig


I bought this a couple months ago at CVS for under $2 thanks to their BOGO 50% off sale and my $1 off coupon. In the store this looked like a dark raspberry shade - in reality it's a medium purple. It has a sheen to it, but not shimmer or sparkles.
[PROS]
no fallout
smooth
pigmented
true to color - shade in pan is the same as shade on skin
doesnt crease or smudge
easy to blend
cheap (approx. $4.50 regular)
alot of product
[CONS]
These single shadows need to come in more shades. There are tons of neutrals/browns and very little of anything else.
I wore this yesterday as a crease and outer corner color. I applied it super lightly because i didnt want a dramatic look and it turned out pretty nice. When applied lightly and blended well its a pretty light sheernpurple shade, when applied more heavily its a medium opaque purple.
Overall i really like this shade although i do have several colors like it. Like i said - in the store it looked like more of a raspberry shade and it isnt, so that was a little disappointing but otherwise its great. These CG Single Shadows are really nice quality, i havent purchased one that i didnt like yet.

Monday, July 25, 2011

DIY Light Box for Better Photos!

Click photos to enlarge them


Ever wondered how people get such great photos with perfect lighting and clean white backgrounds? Try this super easy tutorial for making a DIY Light Box in your own home! I did it myself and its so easy!
All photos and written content are mine. This is my written and visual interpretation of an online tutorial i read several weeks ago. I hope this helps!
Cost: Approx. $5 -- Time: 25 minutes
You Will Need:
two pieces of white poster board
4 pieces of plain white paper
scissors
ruler or a straight edge
glue
clear tape
knife or box cutter
    Tutorial: see photos for visual help
  1. Assemble all of your tools and get them ready.
  2. Cut one poster board in half and leave the other whole. You should now have 3 pieces of poster board (2 small,1 large).
  3. On two edges of your small poster boards (the ones you cut) make a 1 inch fold.
  4. Now cut a square in the middle of each small poster board making "windows". using a sharp knife. Leave enough material around the edges to retain some strength.
  5. Take the large poster board and glue it to the two smaller pieces inside of those little 1 inch ledges you folded over.
  6. Loosely tape two pieces of 8.5x11 printer paper onto the window openings of the small poster boards. This will take 4 pieces total (2 per side).
  7. Place your light box near two windows or use two light sources (like lamps, flashlights, etc) on each side of the box (one for the left, one for the right) and you're ready to go! :)
Because this box doesn't have a top it wont be great for super tall objects, but i can assure you its still very large! It can fit a regular sized laptop inside and many many small items. Plus its easy to clean! If you get this dirty just wipe it away. You can also shoot from soooo many different angles because the top AND front are open!
I really should have done this sooner. I have had this tutorial bookmarked in my browser for several weeks, all i needed to do was buy the pasteboard but i always forgot! lol Well, no more! I did not use flashlights as u can see - just my camera flash and an open window. I got a lot of compliments on my photos before but that was thanks to my awesome Nikon Coolpix L110 camera and now they'll be even more amazing! Also - *Price of $5 is under the assumption you only need the poster board and already have the other items at your home. My posterboard was $1.50 each.
Please let me know if this helped you or you have comments, suggestions, questions, etc. I hope my instructions were clear.
If you like this please click "like" and hit the +1 button under the post to spread the word. Thanks for reading! :)
    All photos and written content are mine. Do not use.

WnW Dreamweaver Giveaway hosted by Kawaii Barbie!


Please follow Kawaii Barbie and enter her Wet-N-Wild Dream Weavers Giveaway! Rules and information here.  I just entered and now im super excited LOL i have been looking for these but cant find them!

EOTD: Vibrant Spice Quad


This is the first eye look i've created using my new AVON True Color Eyeshadow Quad in Vibrant Spice., $7.99. These quads come in tons of other shade options also.

Tutorial
  1. Apply a primer like UDPP to lids
  2. Shade Lush Lavendar (purple) into creases and along bottom lashline.
  3. Sweet Shimmering Copper (pinkish copper) all over lids.
  4. Highlight browbone with Gold Sand (yellow gold) and apply same shade into inner crease also.
  5. Coat lashes with black mascara and line waterlines with purple eyeliner.
This is a very pretty Caribbean type look, in my opinion. Definitely a great Summer or Fall palette. The shades are versatile and pigmented. I like it alot! :) Thanks for reading!

HAPPY BIRTHDAY ZOEY!! :)


Today is my daughters 3rd birthday!! I am so proud of her and could not be more grateful for her presence in my life and our lives as a family. She's incredibly beautiful and smart and a very well behaved kid!

Even though she's only 3 she knows all her ABC's, can count forwards and backwards from 1-20, knows all her shapes, colors, and we're currently teaching her to write and read!!! She knows more than most 5-6 yr olds her age and i am sooo proud of her! Love her to death :)

Sunday, July 24, 2011

NOTD: Happy Birthday!


I bought this Milani Gems polish about 2 weeks ago in a Kmart haul and i really only bought it for two reasons: 1) It's a Deborah Lippman Happy Birthday dupe, and 2) It's perfect for birthday manicures! lol. 
TODAY is my daughters birthday party and tomorrow (July 25th) is her 3rd birthday!! :) So thats why i did this mani.
Swatches
1 coat Sally Hansen Hard As Nails
3 coats Essie Marshmallow
1 coat Milani Gems
1 coat INM Out The Door

I really love this manicure! I think its so cute for birthdays and i plan to use Milani's Gems on top of other base colors (black, pink, blue, etc) in the near future to see how it looks. Thanks for reading. What do you think?

Saturday, July 23, 2011

EOTD: Urban Decay Midnight Rodeo


A few days ago I told you about my FREE Urban Decay Order on Hautelook.com from last month. Today i want to show you the simple but pretty eye look i created using my new cream shadow from that haul.

Products Used:
UD Cream Shadow in Midnight Rodeo
Milani Liquif'Eye in Black
Rimmel Extra WOW Lash in Extreme Black

This look is super easy. I simply applied 3 layers of the UD Midnight Rodeo (letting each one dry first before applying another) onto my lids and bottom lashline. Then i finished it off with black eyeliner and black mascara. 

This eyeshadow seriously woke up my eyes and make them look bright and light reflective, it was sooo pretty!! If you have never tried UD Cream shadow i would highly recommend them. Theyre super pigmented and long lasting PLUS they did not crease!!

Friday, July 22, 2011

Help me reach 250 followers...

...and you'll all have a chance to win in my next giveaway! :) Follow me on twitter and post the message below, give me a shout out on your blog, put a link for my blog in your sidebar, or do whatever you want! I promise the prizes for the next giveaway will be awesome! :)

But first we have to hit 250 followers!

Post this to your twitter plz :) - RT Follow @amistabaker and check out my beauty blog! When i hit 250 followers ill announce my giveaway!  http://tinyurl.com/myaffordablebeauty

Maybelline ColorSensational Lip Stain in In The Buff


This is my very first experience with lip stains - ever. I purchased this at WalMart a couple months ago but i loved it so much i knew i had to do a buy more, lol. I really don't like lipsticks or even glosses that much, and i only own a small handful of each. However, these lip stains are great! *Photos are mine.
This particular lip stain marker is Maybelline's ColorSensational in In The Buff (05). It actually the lightest shade i found and still slightly dark - if you ask me. When i think of a 'buff' or nude shade i think of them to be neutral and light. This, however, is a sort of rosey pink shade if you ask me.
[PROS]
weightless
easy to apply
opaque color
no heavy or sticky feeling - basically feels like bare lips
smells really good and fruity
travel friendly
long lasting
didnt need to reapply all night
gave my lips a healthy flush and that 'just bitten' look
[CONS]
marker tip is a little rough, but not too bad
shade was alot darker than i expected according to shade/name
Overall i really like this lip stain marker! I was always scared to try them before because im like... "ok if i put this on and hate it, theres no turning back, my lips will be stained for hours!" but now i dont feel that way. I picked the lightest shade WalMart had to offer in their Maybelline ColorSensational section and i have been wearing it underneath my new CoverGirl NatureLuxe gloss balm in Marble (zero color payoff, basically just a sheer gloss) and the two work really nicely together!
Would i buy more? Yes! I am going to check out some more shades and see if there are any i may like (from Maybelline and other brands that sell lip stains).
Have you ever tried these? I would like to know what you thought or if you have any tips/suggestions for me. Thanks!